Showing posts with label stencil. Show all posts

Sunday, 28 January 2018

"Hugs" tag for "purple " challenge at #onelittletag


Hello again , my friends
Here is another tag I made for the "purple" theme this week at The One Little Tag Craft Challenge.  I used the negative space created whenn I punched out the "heart-shaped moon" for a tag I did last week.  I'm glad I didn't throw the scrap  away!  I backed the heart area with some purple glitter paper.  The background was made from some of the "spray play" papers I created previously.  I used a small punch to cut the little hearts out of gold foil card and a Recollections die for the word "hugs", I cut it again from black card that I used as a drop-shadow..  I mounted to a gold mat and a black mat to finish it off.  I am having fun with purple!
I hope you enjoyed my tag and that it will inspire you to make use of some of the scraps that you might normally throw away.
Have an awesome day, overtone!
Kim  xo

New "Dream" tag for "purple" t challenge at #onelittletag


Hello friends,
This weeks theme at The One Little Tag Craft Challenge  was purple inspired by the new pantone colour of the year.  We are doing any purple for the challenge, though.  I had a bit of a crazy week, so I didn't actually finish any tags until Friday night, but I did work on them, in bits and pieces, throughout the week.  Purple is okay.  It is not my favourite, nor my least favourite colour.  I didn't find it overly inspiring, or so I thought!  I thought I would look around for some patterned paper (of which I have reams and reams, lol) but not much in the way of purple.  It's just not a "go-to" colour for me.  Then I thought I would look through my "spray play" backgrounds that I created previously.  I was completely surprised to see how much I actually used purple. That was the jumping off point, suddenly I was totally inspired.  I created several tags this week, and may still make a few more!

I created this tag using a background I made using a variety of spray inks and stencils, this one on shimmer card from Recollections.  I thought the background looked kind of "dreamy" so I used a Recollections die to cut out the word.  One combination I really like is purple and gold, so since I am using purple, there is going to be a lot of gold in the cards and tags that I make!  It's hard to tell in the photo, but there is a lot of shimmer and veins of gold running through this background.  I liked how this tag turned out.

I hope you enjoyed today's tag, and thanks so much for stopping by.  If you did, I have made several tags for the purple themed week, so please come back and check them out!
Have a great day everyone!
Kim xo

Saturday, 20 January 2018

"Love Tag for #onelittletag


Hello my friends!
I was gone for so long, and now here I am, back again so quickly after my last post!  Feast or famine! The theme for the One  this week was "Love"  I was really pleased with the outcome of this tag.  I would love to be able to take credit for the design, but I can't, it was totally inspired by a couple of different cards that I saw on Pinterest.  I thought the design was simple but so effective.  I really liked it and wanted to give it a try. I'm not 100% sure how those were created, but I did what I thought would recreate a similar look.  I used distress inks in worn lipstick and Barn Door as watercolours.  I "smooshed" them (very technical term!) on my craft mat and used an aqua brush to paint with them.  I didn't use watercolour paper, I used Strathmore Bristol, and it held up well.  I wet the card fist and added the colour..  Then I used a brush pen to write a long script "love".  Then I die cut a heart from a Spellbinders die in my stash to create a stencil.  I used the Barn Door ink to stencil the heart.  I flicked a little water around, as distress inks are water reactive.  Then I "Smooshed" some more ink on my craft ma, spritzed it with a little water and used my brush to splatter it on my tag (I just love splatter!)  Then I scribbled some black ink from my brush pen on the mat and did the same thing..  I mounted it to some heavy black card and called it a day.  Although I am considering mounting it to some red card as well to give it another slim border all around.  Hmmm...


This is the other tag I created this week.  I used some patterned paper from my stash that had the word "love" all over it.  I used some Spellbinders Celebrations Hearst die to cut some hearts out of some of the other patterned papers in the same pad.  I also cut the heaty out of the background and inlayed all the hearts. I used a Tim Holtz stencil with some Barn Door distress ink over the entire background.  I tried to use white ink first with the stencil, but it really didn't show up very well. Then added some white splatters with some watered down white copic ink.  I die cut the "Love" using a Recollections die out of Recollections card.  I used the same red card as a backer to my tag.

I hope you liked my tags.  I have some more ideas for the "love" theme, so I will be back soon with some more tags!
Thanks so much for stopping by
Kim  xo

Monday, 22 August 2016

Tag# 8-22 "Delightful" #onelittletag


Hello again my friends.  This is the other tag that I made tonight Another fairly simple tag with a distress ink background.  I stamped the background with a Hero Arts stamp (one of my favourites!) wising bronze ink.  I stamped my focal image, another Hero Arts stamp, using my stamp positioner.  I used black versafine ink and Blueprint sketch distress ink.  I stamped my Fiskars sentiment with the black ink, added an embellishment from my stash and mounted to a black card to finish it off.


Thanks again for having a look at my tag.
Just a couple of short posts today, but I hope you enjoyed them.
Have an awesome and artful day!

Tag 8-21 "Angel" #onelittletag


Hello my friends!  I was in a tag making mood tonight, and made a couple of tags.  They are fairly simple, using some stamps for the first time and some embellishments from my stash.  I used distress ink for this background and a Tim Holtz stencil.  I was happy to use the Carabelle Studio stamp for the first time.  I used a stamp positioner that I made to first stamp with black versafine ink and go over it in certain areas with my gold ink.  To finish it off, I punched the corners with a Fiskars punch, added some embellishing pearls and mounted it to black card.


Thanks so much for stopping by and letting me share my latest creations with you.
Have an awesome and artful day!


Monday, 8 August 2016

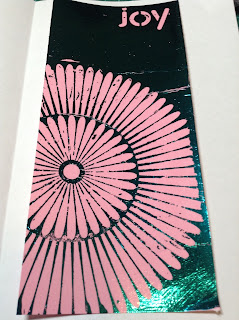
Tag# 8-3 "Joy" #onelittletag


Hello my friends!  Today I am posting another tag cut from one of my "spray and stencil" pages.  


I used embossing paste through stencils for my image and sentiment

 Then I foiled it, running it through my laminator.


I then mounted it to black card to finish it off.

Once again, I had a nice image in the foil waste.  I coated some card with Mod Podge and trimmed it down to tag size.


I placed the foil "waste"  with the reverse image onto the coated card and ran it through my laminator


i mounted my tag first to the same pink card as the background I used, and then to black card to finish it off

Thanks again for joining me,  I hope you enjoyed my latest tag.
Have an awesome and artful day!

Sunday, 7 August 2016

Tag # 8-2 "Not Everyone Who iWanderst" #onelittletag (Using my newly acquired foiling technique)


Hello my friends!
Today's tag was made using one of the backgrounds created during my play with sprays and stencils.  I used a stencil and embossing paste to create the i,age and then foiled it.  I added some Tim Holtz words,  outlined some of the image with  a fine marker edged the tag with gold ink and mounted to black card.


BONUS TAG!

I coated a sheet of cardstock with Mod Podge and trimmed it down to tag size.  I used the left over foil, which I had also used to foil another project and foiled it onto the coated card.  I pieced some scrap foil onto some areas not covered by the original left over foil.  I think it turned out pretty good!


Thanks so much for stopping by my blog today and letting me share my tag with you
If you are new to my blog and are interested in the foiling techniques, please visit my previous posts 

Have an awesome and artful day!


Thursday, 4 August 2016

Playing with sprays and stencils #onelittletag


Hello my friends!  Thanks for joining me.  Just the other day, I was talking about the One Little Tag Craft Challenge  (here)that I have been participating in this year.  I have fallen very behind and I was explaining that for the time being, I am going to ignore the (optional) prompts and just create whatever tags I feel inspired to create.  Well, Jenny Barnett Rohrs, creator of the One Little Tag Craft Challenge on Facebook, who has actually been tied up herself with a big move,  issues another challenge.  Sprays and stencils!  I am sorry, but I cannot ignore this delicious challenge.
  So, as usual, I like to do a lot at once, while I have everything out.
Do you think maybe I like stencils? (and trust me, this is just a sampling!)

Do you think that maybe I like sprays? (also just a sampling)


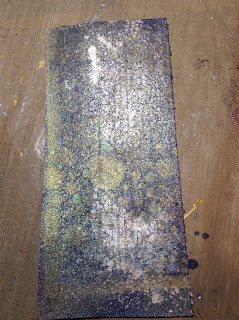
I have lots of photos here for you to have a look at if you like.  I just grabbed whatever spray and stencil I felt compelled to grab, so I am not identifying each one, but you can get the idea of what I am up to.  I started with spraying a "base"  I just t used regular Recollections white cardstock.


It was quite warm today and I just put them out on the porch for a while.  So after these dried, which didn't take long, it was time for the stencils...  


I sprayed through the stencil, which I just sat loosely on the sheet.  I didn't tape them down, I wasn't going for a really pressie look.  On several of them, I flipped the stencil over and used the excess spray to give me the reverse image


(I just love how this one turned out)

I also had some tags already cut and some scrap card and watercolour paper that I had cut down.  I used these to "clean" the stencils.  These photos do not do thee justice.  They turned out soooo cool!  
Some of the previous inks also transferred which gives them a certain depth and texture with some  beautiful shimmery areas.  I like some of the ghost prints as much or better than the original images


Some of the pages that I created today will be cut down into tags, I will keep some as mixed media backgrounds, some will be cards and perhaps, some will become some of the first ever ATCs that I may try. 
I have not actually produced a tag today.  However, I did have a very productive day participating in the challenge!

Thanks so much for joining me and having a look at my blog, You are so appreciated!


Thursday, 28 July 2016

Trust the Magic - A Mixed Media Girl


Hello my friends!  Today I am sharing another whimsical  mixed media girl.   My sister wanted me to do a fairy girl, so she is a fairy. (I love fairies, too)  I think I am going to do a series and make some cards with them..  This seems to be what I am enjoying for the moment!
When I started this art project, I had no idea what I was going to be doing.  In fact, I was doing various backgrounds to choose one for my first attempt at  Mike Deacons "Mission Inspiration|" (which I still haven't finished, but will be posting soon!)  So I did things in a specific order on all of them to start with, since I wasn't sure which one I was going to use.


We were supposed to add colour with a baby wipe, add some tissue paper or napkin fragments and then cover with a thin coat of Gesso..  this is where I veered off coarse.  The next step was to do some embossing paste through a stencil and then add two opposite colors.  I used my sprays and was starting to add to use opposite colours, but got carried away with the sprays!  I liked the direction this was going but knew that it wouldn't be for the challenge.  I actually ended up with several backgrounds that I really liked (and that you will eventually see) as well as my page for the mission. So it was a productive day at art last Wednesday.


Tonight, this is the background that I chose to use and added some embossing paste through some Tim Holtz stencils (he has such cool stencils!)  I actually did some embossing on all of the backgrounds, since I had everything out, but I did this one with intent!


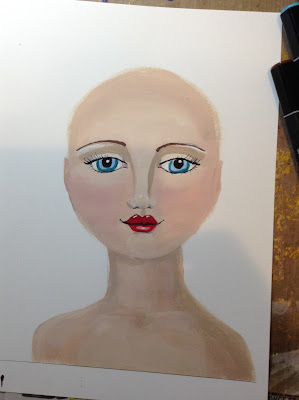
Then I got one of the copies of a face I had sketched on watercolour paper.  I decided I wanted to start off with paint on this one. First I added in the outline of the face and neck.  I used acrylic paint (craft).  This is the first one I have done with acrylic paint.


I added in some details with a black  marker.


Then I copied it, slightly reduced on white card and added in some more details.  I knew this was too big for my project, but with my vision issues, it's a little easier to work larger.


I copied her again, much small, and cut her out.  I cut out some hair and her dress from some scraps of patterned paper in my stash.


I needed to add some wings, so I scrbbly sketched some on some vellum with a gold Sharpie.  Then I thought I would use the rubber cement foiling technique.  So I used the brush provide in the glue jar to roughly "paint" around the wings, let it dry and then put my deco foil on top and gave it a rub.


I edged her hair with my gold ink and her dress with some distress ink.  Then I assembled her.


I added her to my page, outlined her with a PITT pen, added my sentiment (a Prima stamp)  I punched out some butterflies from some gold foil paper. 


 In retrospect, I may not have added them, or so many,  But too late know, so I outlined them to give them more definition, since they weren't going anywhere!

I hope you enjoyed todays post.  Thanks so much for stopping by and letting my share my efforts with you.  Have an awesome and artful day!