Showing posts with label tag. Show all posts

Thursday, 8 February 2018

"Walking in the Rain" tag for #onelittletag


Hello my friends!
This is a tag I created a few days ago for the watercolour challenge at The One Little Tag Craft Challenge.  For those of you who don't know what this is, it is a Facebook group created by Jenny Barnett Rohs of Craft Test Dummies.  The focus of the group is to encourage everyone to try and be creative every day, or as often as you can.  The theory being that by taking just a few minutes and doing a small tag, nothing elaborate, every day could keep the creative juices flowing. I enjoy making the tags, so I tend to spend a little more time on them.  I don't get to them every day, but I would say I do something creative most days.  I usually go to our art club twice a week and if I'm not being creative, I am often thinking about what I will do the next time I am!  So whether you spend 10 minutes or 2 hours on a tag, you are staying inspired!  It is also a good opportunity to do some experimenting without making a big commitment.  So if there are any of you that are looking for some inspiration or encouragement and would like to share some of your art, or just see what other are up to and to gain some inspiration, I would encourage you to check it out.  It is no longer just tags, anything you create can be posted, cards, art journals, drawings etc.  there is a weekly prompt, that is completely optional.  There are also random draws for giveaways.  A lot of fun and a good group of people.  Anyways, back to my tag, lol


Watercolour is not my medium.  I like to paint, but I paint in acrylics and I just don't have the knack of watercolour.  I suppose some lessons would help.  I do like to play around and drop paint onto a wet paper and let it blend organically, and play around.  I did a landscape, or attempted one, that I have to admit I scrapped.  But I was determined to do at least one scene.  So this is quite simple, but I don't mind how it turned out.  I used Winsor Newton watercolours, and Crayola brush pens on the stamp of the girl with the umbrella.  I struggled with watercolours this week.  But I also had a lot of fun with my "Purple Girl".  I stepped out of my comfort zone, which was the most important thing, more important than the result.  I hope everyone does that once in a while, it helps us discover new things.  I wonder how many things I would have missed had I never strayed from my comfort zone.

Well, lots of words tonight, I usually try and keep things short and sweet.  Thanks so much for taking the time to read and for letting me, once again, share my little pieces of art with you.

Kim  xo

Monday, 5 February 2018

A new "Purple Girl" watercolor tag for #onelittletag


Hello my friends!
Well, this has been another busy week (some of it involving plumbers!) and I haven't had a change to finish a tag until today!  The challenge this week at The One Little Tag Craft Challenge is water colour.  I had a bit of a head-start with this tag as I created this purple-haired beauty for last weeks purple challenge, but didn't get a chance to use her.  Well, I just happened to use water colours to create her, so guess what...!  She was created using a Penny Black stamp.  I used some Jane Davenport water colours and pencil crayons..  I created a couple of water colour background sheets for her dress and the tag background.  I had fin with those!  I dropped in all kinds of different water colours, including some metallic and just let them basically do as they pleased.  And now I have a few extra tag backgrounds left over as well!


I stamped her dress onto the paper I created and cut it out.  I stamped my favourite flourish stamp in gold ink onto the background.  It is so hard to pick up in photos, but there is a lot of shimmer on this card.  There is metallic watercolour in her dress and in the background, as well as the gold s metallic inked stamp.  I had some fin embellishing her dress and   giving her a choker.  I usually like to add a word or phrase to my tags, but there wasn't anything that popped into my head for this tag.  I may leave her a she is, or add something later if I am inspired.

I hope you enjoyed todays tag, I enjoyed creating it.  Thanks so much for stopping by!
Kim xo 

An Elegant Purple and Gold Card #onelittletag


Hello my friends!
I am a little behind in posting, but this is a card I made for the purple challenge last week on The One Little Tag Craft Challenge.   I just love the combination of purple and gold.  If you are following along, you may have noticed that.  Most of my purple themed cards or tags are using that combination.

For this card I used a Spellbinders die and cut out some gold foil board.  FYI, I get my gold foil board  at the dollar store.  Both Dollaramma and the Dollar Tree have the same foil board.  It comes in a package of 6 sheets 0 gold, silver, red, green and blue.  It's very handy at Christmas time!  I just wanted to mention this because I really like the foil card that I get there and it die cuts beautifully.  Sometimes a cheaper price doesn't necessarily mean an inferior product.   Anyways, I die cut my foil card and adhered it to some purple glitter paper, which I then adhered to a black card base.  It is sometimes difficult to stick to the glitter paper, so I ran it through my Cuttlebug just sandwiched between the plates to squish everything together in an attempt to make it adhere better, which it did. .  It almost made this look like a die cut inlay.  I really like the effect that created.  I added a few sparkly embellishments and left it as it is.  I will keep this in my stash and when an occasion comes up that this card will be suitable for, I will add a sentiment.  I think this is quite elegant with the gold foil details.
I hope you have enjoyed my latest card.  Thanks so much for stopping by to have a look!
Havve a great day everyone!
Kim xo

Sunday, 28 January 2018

"Hugs" tag for "purple " challenge at #onelittletag


Hello again , my friends
Here is another tag I made for the "purple" theme this week at The One Little Tag Craft Challenge.  I used the negative space created whenn I punched out the "heart-shaped moon" for a tag I did last week.  I'm glad I didn't throw the scrap  away!  I backed the heart area with some purple glitter paper.  The background was made from some of the "spray play" papers I created previously.  I used a small punch to cut the little hearts out of gold foil card and a Recollections die for the word "hugs", I cut it again from black card that I used as a drop-shadow..  I mounted to a gold mat and a black mat to finish it off.  I am having fun with purple!
I hope you enjoyed my tag and that it will inspire you to make use of some of the scraps that you might normally throw away.
Have an awesome day, overtone!
Kim  xo

New "Dream" tag for "purple" t challenge at #onelittletag


Hello friends,
This weeks theme at The One Little Tag Craft Challenge  was purple inspired by the new pantone colour of the year.  We are doing any purple for the challenge, though.  I had a bit of a crazy week, so I didn't actually finish any tags until Friday night, but I did work on them, in bits and pieces, throughout the week.  Purple is okay.  It is not my favourite, nor my least favourite colour.  I didn't find it overly inspiring, or so I thought!  I thought I would look around for some patterned paper (of which I have reams and reams, lol) but not much in the way of purple.  It's just not a "go-to" colour for me.  Then I thought I would look through my "spray play" backgrounds that I created previously.  I was completely surprised to see how much I actually used purple. That was the jumping off point, suddenly I was totally inspired.  I created several tags this week, and may still make a few more!

I created this tag using a background I made using a variety of spray inks and stencils, this one on shimmer card from Recollections.  I thought the background looked kind of "dreamy" so I used a Recollections die to cut out the word.  One combination I really like is purple and gold, so since I am using purple, there is going to be a lot of gold in the cards and tags that I make!  It's hard to tell in the photo, but there is a lot of shimmer and veins of gold running through this background.  I liked how this tag turned out.

I hope you enjoyed today's tag, and thanks so much for stopping by.  If you did, I have made several tags for the purple themed week, so please come back and check them out!
Have a great day everyone!
Kim xo

Wednesday, 2 November 2016

"Noel" A new Christmas card, a Shaker card


Hello All!  Today's card is a shaker card, which is something I am fairly new at.  I have only made one before.  I started off with my distress ink blended background.  I splattered the water reactive ink with a water/ perfect pearls mixture.

I stamped my image with a Tim Holtz set from a couple of years ago, using Versafine Black Onyx ink in my home-made stamp positioner so that I could repeat stamp a few times to get a good, solid and dark impression.


I used my new Tim Holtz die again, along with an Elizabeth Crafts die and a Tim Holtz punch.  I knew this die would be versatile!  I die cut the globe from fun foam as well which I sandwiched between the layers to give dimension and create the space for my shaker elements.  I used some mylar to cover the front of my shaker element and under the top two layers.

Once my card was assembled, I embellished it with the globe "stand", the Noel sentiment, a few pine boughs punched out of gold card and a purchased snowflake embellishment (from Michaels)

Thank you so much for visiting my blog and checking out my latest Christmas card.  I hope you enjoyed it!
Have an amazing day everyone!

Tuesday, 1 November 2016

My latest Christmas card using a Tim Holtz die


Hello my friends!  Thank you for visiting and having a look at my latest Christmas card. 
I created this card using my new Tim Holtz die.  I have a feeling that this is going to be one of my favourite and most versatile die sets in my collection.


I also used an Inkadinkadoo stamp set.

I used distress ink to blend a background.  I punched a circle out of some low-tac shelf liner to make a mask for the moon.   I just love how water reactive distress ink is, and I  splattered some water with some perfect pearls in it to give a snowy shimmery effect.  I edged the houses and the inside of the globe  I used my Wink of Stella clear to add some shimer to the moon and the roofs.


I had some gold trim with an adhesive back (that I got from Michaels) that I used to embellish the globe.

This was a fun card to make because I like to create little scenes.  It took a bit of time to assemble all the pieces, so it wouldn't be ideal to make multiple cards, but very nice for that special card.

Thanks again, so much for taking the time to visit my blog and I hope you enjoyed my latest card and that perhaps it has inspired you to create your own card.

Have an awesome day!

Monday, 3 October 2016

Tag 9-25 "Merry Christmas" with foiled die cut elements


Hello my friends!  I am back to creating Christmas cards and tags,  This tag was created using some of the foiled and die cut elements that I showed in my previous post on foiling die cut images without toner paper .  This is similar to a tag I have done previously, but this time I foiled my die cut elemants instead of die cutting foil board,  so just another option.

I started off this tag with some distress inking using |Picked Raspberry" and "Broken China"  I used a torn sheet of paper to mask the snow hills.  I flicked the tag with some water because distress ink is so water reactive and I just love the look.  I also flicked on some Heidi Swapp sheer spray to give the look of some snowflakes.


Once I finished my background, I mounted it to some silver foilbaord and then to some Recollections Shimmer card, leaving a small border on each. 
I used a Tim Holtz die to die cut my trees from card that I had prepared for foiling, and an Yvonne Creations die for the sentiment.  

 Then I foiled the die cut pieces.  Once they were foiled,  I assembled my tag.  i used Artist-tac adhesive sheets.  These have small adhesive dots that adhere to any paper you want to stick when you place  your item between the adhesive sheet and the liner and burnish.  I find this awesome when I have an intricate and fine die cut shape that is difficult to glue.  I use these sheets all the time and they last for quite a while.  I get a lot of use out of one sheet.  They come in a package of 25 and I thik I paid about $25 for the package, so they are a little pricey when you have to buy a whole package, but I have found them well worth the money.  When I run out (which won't be for a long time!)  I will purchase another package.  I think I got this package at the beginning of the year, I use them for almost every tag I make, and I'm on the fourth sheet. (just to give you an idea).


Well, I hope you enjoyed today's tag.  Thank you so much for stopping by to have a look!

Saturday, 17 September 2016

Tag 9-15 "I can see clearly now" #onelittletag


Hello Everyone!  Here is another tag for the song lyric prompt.  Jimmy Cliff's "I can see clearly now"  I have always loved this song, something about it just resonates with me.
I wasn't sure what image i wanted to do to go with the lyric.  This ws actually a background I had created a while back.  I really liked it and have been waiting for the opportunity to ise it, and this seemed to fit.


I believe these are the colours I used when I crested this background.  That is a Tim Holtz stencil.  You may have noticed that most of my stencils are well used!

I hope you enjoyed today's tag.  here is a link if you would like to enjoy today's song, as well!
Thanks so much for stopping by.  Have a bright sunshiny day everyone!


Friday, 16 September 2016

Tag # 9-14 "Puppy Love" #onelittletag


Hello my friends!  I am back to making a few tags, lately.  The prompt at The One Little Tag Craft Challenge has actually changed, but it was song lyrics.  So my tag is based on a song lyric.

I recently got a new Tim Holtz stamp set, "Crazy Dogs"  and I thought this would be the perfect opportunity to use it.


I stamped the images onto some card stock.  I roughly sponged some distress ink over the images and went in and added a bit of detail with my distress markers and a white gel pen.  I had sponged over the eyes.  My intention was to add some "googly eyes", but do you tjink I could find them???  S,o, I coloured in the eyes with my white gel pen and added the pupils.  this actually worked out well because it allowed me to direct the dogs gazes.  
I used a background from my stash that I had created earlier.  I had used distress ink, a Tim Holtz stencil, some distress paints applied with bottle cars and some splatters (which I love, as you may know!)


I  cut out the pups (I don't have the dies, yet)  which is kinda tough when you can't see, so they definately are not perfect!  I also stamped the images on my background.  This helps to add detail back in that may get cut off, whiskers for example.  It's a good little trick if it's not something you do already.  I punched out my hearts and printed out the lyrics from Donny Osmond's "Puppy Love".    Am I dating myself, lol?

I inked the edges and mounted to black cards, as usual.
Thank you for joining me today, I hope you enjoyed my "Puppy Love" tag.
Have an awesome and artful day!

Friday, 2 September 2016

Tag # 8-31 "Best Friends" Made from Dollar store haul


Hello my friends!  I have been busy painting for a show that is coming up fast!  So this was the perfect time to take a break and make a quick tag,  What better way to do a quick tag, than using embellishments that are already made with a sentiment on them?  As I mentioned in my previous post,  I wanted to do a tag using only things that I got at the dollar store.  So that's what I did to make this quick and easy tag that could easily be translated into a card.  Everything I used was from the dollar store, even the adhesive, with the exception of the punch I used for the butterflies.  But the card that I cut them out of was!  In hind-sight, I probably should've used a better pair of scissors to cut the ribbon!


Keeping it pretty short today, but I did want to share this with you.  I wanted to show that you can use dollar store items, and do something quick and easy, and it can still look pretty good. (but use sharp scissors!).  I actually have a couple of other ideas, so you may see one or two more tags mad from my haul.  Thanks so much for popping in!  I hope you like my quick and easy tag.
Have an awesome and artful day!

Monday, 15 August 2016

"Love" Tag# 8-12 #onelittletag


Hello my friends!
Another tag for the "gratitude" prompt.  What could be more precious than the love of family?  I do not have a large family, but I cherish every member and love and miss those that are far away.  I am so grateful for the love of my family.
Thanks so much for joining me again and letting me share my latest tag with you.
Have an awesome and artful day!

Monday, 8 August 2016

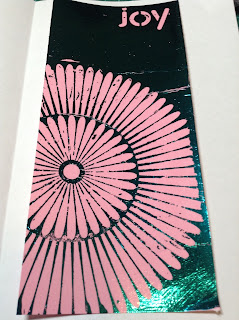
Tag# 8-3 "Joy" #onelittletag


Hello my friends!  Today I am posting another tag cut from one of my "spray and stencil" pages.  


I used embossing paste through stencils for my image and sentiment

 Then I foiled it, running it through my laminator.


I then mounted it to black card to finish it off.

Once again, I had a nice image in the foil waste.  I coated some card with Mod Podge and trimmed it down to tag size.


I placed the foil "waste"  with the reverse image onto the coated card and ran it through my laminator


i mounted my tag first to the same pink card as the background I used, and then to black card to finish it off

Thanks again for joining me,  I hope you enjoyed my latest tag.
Have an awesome and artful day!

Sunday, 7 August 2016

Tag # 8-2 "Not Everyone Who iWanderst" #onelittletag (Using my newly acquired foiling technique)


Hello my friends!
Today's tag was made using one of the backgrounds created during my play with sprays and stencils.  I used a stencil and embossing paste to create the i,age and then foiled it.  I added some Tim Holtz words,  outlined some of the image with  a fine marker edged the tag with gold ink and mounted to black card.


BONUS TAG!

I coated a sheet of cardstock with Mod Podge and trimmed it down to tag size.  I used the left over foil, which I had also used to foil another project and foiled it onto the coated card.  I pieced some scrap foil onto some areas not covered by the original left over foil.  I think it turned out pretty good!


Thanks so much for stopping by my blog today and letting me share my tag with you
If you are new to my blog and are interested in the foiling techniques, please visit my previous posts 

Have an awesome and artful day!


Saturday, 6 August 2016

Part 2 of More Foiling Awesomeness!


Hello my friends!  Welcome back for some more foiling fun.  If you saw yesterdays post, you may recall how excited I was to find some new ways of foiling.  I had not heard of the new Minc reactive paint and foil reactive spray.  I was delighted to discover that Heidi Swapp metallic embossing paste and screen ink were also foil reactive.  Especially since I had some of both.  But it got my mind turning and I wondered if other pastes and mediums would work, which happily they did!  If you didn't see yesterdays post, you may want to have a look at it because this is a continuation of that post.  I tried several different things and of coarse, I couldn't stop!  So here are the results of the other products I tried and my own reactive spray!  Everything I tried was successful, although some did give better results than others.


I have a lot of different products on hand that I use.  I realize that some of you that don't paint may not have most of these products, so I thought I would try godd ole Mod Podge as well, since that is something a lot of crafters use.
I ran the various gels and pastes through a Tim Holtz stencil and let them dry thoroughly before foiling.  I just use a regular laminator to do my foiling, I do not own a Minc.  I use a folded sheet of copy paper as my carrier .  


Starting from the top left:  Liquitex Pouring medium, Golden Regular Gel, Golden Soft Gel, Golden Coarse Molding Paste  (bottom left)  Golden Light Molding Paste, Golden Molding Paste, Tri-Art Gloss Gel Medium, Tri-Art Molding Paste


The foil clung to everything I tried!  I found that it adhered best to the gels, the pastes seemed to have a more distressed look, especially the coarse molding paste.  Depending on the end result you are looking for, this is also a very cool effect.


I also tested Liquitex Pouring Medium, Liquitex Gloss Medium/ Varnish (painted on with a brush) and Mod Podge..  All of these worked very well


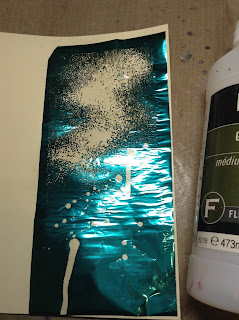
Until I saw Kate Palmer;s video, I didn't even know that there was a foil reactive spray on the market.  I decided to try my own spray.  I used 1 part Pouring medium and just less than 1 part Air Brush medium which I shook together in a spray bottle.  This gave me a pretty fluid consistency.  This worked very well and gave an interesting effect.I think next time i may try using a little less air-brush medium to see what effect I will get with a little heavier texture.


I also dribbled some of the spray mixture onto the card and let it drip as well.


Then i decided to try something else.  I don't want to waste a bit of my foil so I decided to try and make use of some of the leftovers that had a good  image. I painted a coat of Liquitex Gloss Medium onto some card and used the reverse image in the left over foil to foil another tag


This also worked very well.  Mod Podge also works (I did try that as well)  But please note, any area that is coated with the medium, or mod podge if you choose to use that, that is exposed and not covered by foil WILL stick to your carrier sheet.  I use copy paper as my carrier sheet, but take special care if you are using a good Minc carrier.  You could also use paper, but either way, make sure it is entirely covered so that you don't ruin your project!

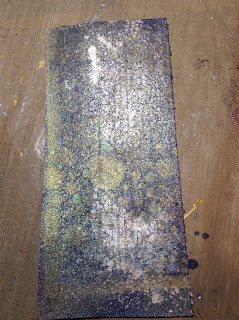
I am going to share an accidental bonus with you today.  I used  Faber-Castel Gloss Gel Medium through a stencil onto one of the tags I had made during my play with spray and stencils.  My intention was to do some foiling, but when it dried, an interesting thing had happened.  The darker spray from underneath, leached up into the medium and gave it a very interesting effect.  So I decided to leave it as it is.

Thanks so much for joining me once again.  I hope you found this information fun and useful and will give it a try.  . You don't need a lot of fancy equipment and products to do foiling, just a regular laminator and products that you may already have at home. I am already making good use of this new  knowledge, which you will see soon!  My mind is still whirling with ideas, so there may soon be a Part 3 to the Foiling Awesomeness.  I have some more experimenting to do. Thanks again for looking at my blog,  Please share if you know any foiling fans that would enjoy trying some of these options!
Have an awesome and artful day!

Be sure to check out some of my other foiling posts