Showing posts with label Dylusions spray. Show all posts

Friday, 5 August 2016

Tag # 8-1 "Transform" #onelittletag (with a little foiling!)


Hello my friends!  Well, tonight I made a tag for the One Little Tag Craft Challenge. The prompt is to use sprays and stencils.  I wasn't going to worry about the prompts for the time being, but this was one I liked!  So this tag was created using a background made during my play with sprays and stencils.  I also used a new foiling technique (which I will be posting!) and punched a butterfly out of gold foil card.  As usual, I mounted my tag to black card.


Thanks so much for stopping by and having a look at my tag.  If you love foiling, as I love foiling, pop back for my next post for some more foiling fun!

Thursday, 4 August 2016

Playing with sprays and stencils #onelittletag


Hello my friends!  Thanks for joining me.  Just the other day, I was talking about the One Little Tag Craft Challenge  (here)that I have been participating in this year.  I have fallen very behind and I was explaining that for the time being, I am going to ignore the (optional) prompts and just create whatever tags I feel inspired to create.  Well, Jenny Barnett Rohrs, creator of the One Little Tag Craft Challenge on Facebook, who has actually been tied up herself with a big move,  issues another challenge.  Sprays and stencils!  I am sorry, but I cannot ignore this delicious challenge.
  So, as usual, I like to do a lot at once, while I have everything out.
Do you think maybe I like stencils? (and trust me, this is just a sampling!)

Do you think that maybe I like sprays? (also just a sampling)


I have lots of photos here for you to have a look at if you like.  I just grabbed whatever spray and stencil I felt compelled to grab, so I am not identifying each one, but you can get the idea of what I am up to.  I started with spraying a "base"  I just t used regular Recollections white cardstock.


It was quite warm today and I just put them out on the porch for a while.  So after these dried, which didn't take long, it was time for the stencils...  


I sprayed through the stencil, which I just sat loosely on the sheet.  I didn't tape them down, I wasn't going for a really pressie look.  On several of them, I flipped the stencil over and used the excess spray to give me the reverse image


(I just love how this one turned out)

I also had some tags already cut and some scrap card and watercolour paper that I had cut down.  I used these to "clean" the stencils.  These photos do not do thee justice.  They turned out soooo cool!  
Some of the previous inks also transferred which gives them a certain depth and texture with some  beautiful shimmery areas.  I like some of the ghost prints as much or better than the original images


Some of the pages that I created today will be cut down into tags, I will keep some as mixed media backgrounds, some will be cards and perhaps, some will become some of the first ever ATCs that I may try. 
I have not actually produced a tag today.  However, I did have a very productive day participating in the challenge!

Thanks so much for joining me and having a look at my blog, You are so appreciated!


Thursday, 28 July 2016

Trust the Magic - A Mixed Media Girl


Hello my friends!  Today I am sharing another whimsical  mixed media girl.   My sister wanted me to do a fairy girl, so she is a fairy. (I love fairies, too)  I think I am going to do a series and make some cards with them..  This seems to be what I am enjoying for the moment!
When I started this art project, I had no idea what I was going to be doing.  In fact, I was doing various backgrounds to choose one for my first attempt at  Mike Deacons "Mission Inspiration|" (which I still haven't finished, but will be posting soon!)  So I did things in a specific order on all of them to start with, since I wasn't sure which one I was going to use.


We were supposed to add colour with a baby wipe, add some tissue paper or napkin fragments and then cover with a thin coat of Gesso..  this is where I veered off coarse.  The next step was to do some embossing paste through a stencil and then add two opposite colors.  I used my sprays and was starting to add to use opposite colours, but got carried away with the sprays!  I liked the direction this was going but knew that it wouldn't be for the challenge.  I actually ended up with several backgrounds that I really liked (and that you will eventually see) as well as my page for the mission. So it was a productive day at art last Wednesday.

Tonight, this is the background that I chose to use and added some embossing paste through some Tim Holtz stencils (he has such cool stencils!)  I actually did some embossing on all of the backgrounds, since I had everything out, but I did this one with intent!


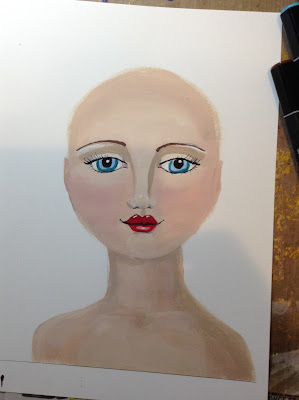
Then I got one of the copies of a face I had sketched on watercolour paper.  I decided I wanted to start off with paint on this one. First I added in the outline of the face and neck.  I used acrylic paint (craft).  This is the first one I have done with acrylic paint.


I added in some details with a black  marker.


Then I copied it, slightly reduced on white card and added in some more details.  I knew this was too big for my project, but with my vision issues, it's a little easier to work larger.


I copied her again, much small, and cut her out.  I cut out some hair and her dress from some scraps of patterned paper in my stash.


I needed to add some wings, so I scrbbly sketched some on some vellum with a gold Sharpie.  Then I thought I would use the rubber cement foiling technique.  So I used the brush provide in the glue jar to roughly "paint" around the wings, let it dry and then put my deco foil on top and gave it a rub.


I edged her hair with my gold ink and her dress with some distress ink.  Then I assembled her.


I added her to my page, outlined her with a PITT pen, added my sentiment (a Prima stamp)  I punched out some butterflies from some gold foil paper. 


 In retrospect, I may not have added them, or so many,  But too late know, so I outlined them to give them more definition, since they weren't going anywhere!

I hope you enjoyed todays post.  Thanks so much for stopping by and letting my share my efforts with you.  Have an awesome and artful day!