Hello my friends and Happy New Year! Things have been a little crazy around here and I can't believe t's already the middle of January, and this is my first post of the year.. I hope everyone is great, settling into 2017 and anticipating lots of wonderful things this year. I don't really make "resolutions", but I do have a mental list of some things tat I'd like to try this year.
Last year was a year for several new things for me. I have to admit, I'm a little "old school" when it comes to technology, but I'm trying! I started this blog last January, my first and only (so far!). I still don't really know what I'm doing and have a lot to learn, but I am having so much fun with it. I love sharing with all of you. I love seeing that people from all over the world have stopped in to have a peek at what I have been up to. I think it is so amazing to feel connected to people in so many countries. My original intent with this blog, was to share my art and cards with my sister, who I haven't seen for several years and who lives 3000 miles away. I had text Kerry some photos of of cards that Ii had been making and she was interested in trying some as well. I thought this would be a great way to craft together. We could speak on the phone and them I could show her what I was talking about in my blog and share different ideas and techniques with her.
I also joined some FB groups for the first time. The first one i joined was the One Little Tag Craft Challenge, (which is continuing this year, in case anyone is interested in checking it out) So I made tags for the first time, which I really love making. The idea behind the challenge was to try and make on little tag a day, just to stimulate your creativity. Once a day isn't always possible, but that doesn't matter. To be honest, I haven't made a tag yet this year. I started off really well last year but sometimes life gets in the way of art projects, or sometimes other art projects get in the way of tags. It still didn't matter, you can jump in and out as much as you like. But I have to tell you, it really kept me inspired. So you will find many many tags on my blog. I also joined some great Google communities. I have found that people are so kind and supportive and it is so motivating. So thank you to any of you who may be a part of the FB groups and G+ communities I am in. I will share links at the end to some of those wonderful groups I participate in.
I know I am a little slow with my technology, but I have set up an Instagram account. I haven't posted anything yet, but once I get going I will share that as well. So that was one thing I wanted to do this year. Another goal this year is to do some crafting videos, so hopefully I will have some of those to share on my YouTube channel as well. I have never done any art journalling, that is something I'd like to do this year. There are other little creative challenges I think I will be trying throughout the year as well.
I hope you are inspired to try some new creative endeavors this year. I would love to hear some of the ideas on your list. It might spark even more new interests for me, or others that may read this.
NOW, without further adieu, let's get to Jane Davenport!!! I was so excited to see so many YouTube videos showing that her product was now available. Then I was disappointed, because there was nothing at my local Michaels (I believe this is exclusive to Michaels) and when I searched Michaels Canada, nothing came up for Jane Davenport. Alas, I thought, it must only be in the US. Well, I did not give up my search and I am so happy to report that the Jane Davenport line IS also in Canada, although it is not at every store. I was also very pleased to discover that they were not a crazy price point, (especially with coupons!) and some items were quite reasonable even without the coupons.
What I am sharing is a collective haul from a couple of different Michaels stores spanning a distance of 4 towns! I have not tried any of this product yet, and I will be sure to share with you what I think of it when I do. Most of the reviews (all actually) that I have seen have been good, so I was pretty confident making my purchases There are many more items in the line, including water colours, pens journals, rub-ons and more. I will probably get some more things down the line, but I did manage to get most of what I wanted.
 |
| I am excited to try these pencils, they supposedly play very well with paint and other media |
 |
| I actually have a lot of Gesso and matte and other mediums that I use in my painting, but I thought I would try these anyways. They are a handy size to keep with my crafting supplies |
 |
| All these stamps were a very good price point, in my opinion. They were $8, or maybe even $8.99 (Cdn), so probably even less in the US. |
 |
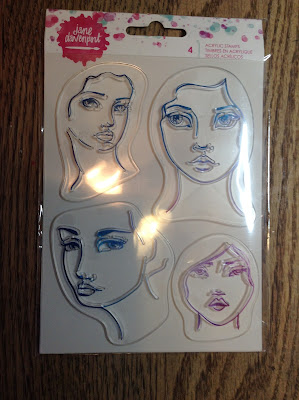
| This stamp set is going to be so fun to play with, creating different faces! |
 |
| I am also looking forward to giving these a try, especially the white, I am always on the hunt for good white pens for mixed media. |
 |
| How cool are these! |
I am looking forward to giving my new stash some creative love. However, I am also busy painting as I will be displaying my art at the Ajax Town hall soon, and I am hoping to have some fresh new works, which I will share. So, now that I have all my Jane Davenport goodies, before they sold out, I will reluctantly have to put them aside for a little while. But next month, I'm sure I will have someting to share, so make sure to check back. It would be great to hear what any of you, who have the new products, think of them.
Thanks so much for stopping by, here's to a wonderful creative year together! xo
Here are slinks to some of the different groups and communities I have been enjoying, I hope you can check them out.
One Little Tag Craft Challenge , Facethescraps , Creating and Sharing Mixed Media Art ,All Things Mixed Media Art! , Krafters Kommunity , Card Making Haven


