Wednesday, 13 January 2016

Play day for my Inner Child


Things have been a little busy, so I'm a little bit behind on my tag challenge.  I did actually get tag # 10 (fun) started on time, but couldn't get it finished.  Yesterday was busy hanging paintings at City Hall and then to the art club. Afterwards, I ended up going to a late move with my friend Bonnie (we saw "Joy", which we thought was pretty good despite poor ratings BTW).  So tonight I finished off #10 & #11. 
A little background, while I was out Christmas shopping, I ran across this "Spirograph" knock-off.  Remember Spirograph?  I loved it when I was a kid.  Seeing it at the store immediately took me back in time.  I impulsively bought it.

I don't know, maybe it's just me, but I just can't hear a kid saying, "Oh Santa,  I want a Hypotrochoid art set for Christmas!"  Oh well, I guess "Spirograph" was a bit of a mouthful, too.  One of the ladies in the challenge commented on my tag and mentioned letting my inner child play and I thought that was  exactly what I was doing. 
I have to admit, while this little set wasn't totally cheap, it definitely wasn't the same quality I remember from the original.  The gears were kind of warped and slipped sometimes as I was trying to make it work.  I used some fine tip markers on the first tag.  Luckily they weren't a good set because for some reason this was very hard on them and ruined a couple. Despite all of this, I had fun.  Even my daughter, who never wants anything to do with my art, wanted to give it a try. I doodled in the centres with black marker and added some tiny gems. Once the background was done, I trimmed it, punched the corners, added some bright ribbon in coordinate colours and some precut letter I had too make the word "fun" And then mount it to some black card.  Some green ribbon finished it off. This is a little different for me in style and colours,

Then I thought, since I still have it out, I would try some white and gold gel pens on black card for a totally different look. Added some gens, some glod sttring and punched out a Graphic 45 sentiment that I stamped with black archival ink. I double mounted this one, first to whit card, to which I added a gold outline with a sharpie marker, and then to black card.  Gold cord tie at the top to finish it off.
Now I'm only one behind!


Sunday, 10 January 2016

I Believe in...lazy tags #onelittletag


I felt like I kind of wimped out a bit on todays tag, but I was tired.  Despite being tired, I still wanted to keep up with my tag a day.  So I thought I'd do some quick stamping on one of my pre-cut Gelli prints (the tag in the photo is similar, but not the one I ended up using)
I used a Tim Holtz stamp with some gold ink to stamp some script in the background.  I used my stamp positioner,  a Verses stamp and a Deep Red stamp of Audrey Hepburn to stamp my tag.  Audrey didn't stamp perfectly because the tag had a bit of texture, so I touched her up a bit.  I added some bling, punched the top edges, mounted to my pre-cut black matting card, punched a hole and tied some gold ribbon from my stash.  But...I just couldn't leave well enough, alone.  I wanted to add some Wink of Stella to her top.  Well, it didn't react well to the archival ink and formed a misty film
I managed to scratch some of it away and touch up with a sharpie.  So, my lazy tag took a little more effort than I anticipated, but I learned a little lesson.  I also need to learn that it is okay to just do some stamping.  There is a reason I have some backgrounds and matts pre-cut...to save time!  
 "Hello Self, it doesn't mean you are wimping out because you are creating something quickly!" 
 It's sinking in.  I don't know why I am having an issue with this, I paint quickly.  Obviously not this quick, but it's all relative.  Sometimes I even paint better that way.  Lazy tags are fine!  The idea is to be creative every day. 


Saturday, 9 January 2016

Play - Tag # 8 #onelittletag

I knew I wanted to base this tag on a step-card I had done for my sister.
I knew I needed the  cat dies and the die I used for the drawers (although, those could easily be trimmed). I wasn't exactly sure how else I was going to embellish the tag, so I gave myself some options


I also had to choose what papers I was going to use.  Sometimes this step can take me more time than actually creating the card or tag I'm working on! Overwhelmed by too many choices.  But, today wasn't too bad.  I liked the paper pak that I had used for my sister's original card, so I wanted to use something from that for the dresser.  I looked at several cute papers for the background "wallpaper", but finally opted to go for one of the back grounds that I had already created by trimming some of my Gelli prints and decorating them with embossing paste and some stencils. Surprisingly (for me) I actually chose one right away.


My backgrounds are cut to 3.25" x 7.75" and the die cut size of the drawers were 1" x 2" so I decided to make my dresser 2.8" x 4.5". I partially punched the bottom to create the legs of the dresser.

I trimmed a little strip of card for the top of the dresser just slightly wider. I trimmed out some fun foam to put behind the drawers to pop them out, I layered two pieces of foam behind the bottom drawer.  I quickly sponged the cats that I had cut out of some cream coloured stock as well as the flowerpot, with some prima edgers. I was originally going to out a little frame on the top of the dresser that held the word "play", which was my word for the tag, but I didn't like the way it fit.  I decided to skip the word on this tag and add a little flower which I punched out of the same card I used for the Matt.  I used little diamond embellishments for the drawer pulls and a tiny one in the middle of the flower to tie it all together. I used a thin gauge wire for the flower stem and attached it with a couple of tiny glue dots. I decided to use a purple cardstock to matt my tag. I punched the corners of the tag and  matt and I edged both with purple distress ink. All that was left was to assemble everything.  I used a little bit of material for the kittens to pull out of the drawer.  To finish things off, I punched a hole and tied some seam-binding ribbon through it.


Hope you enjoyed tag # 8!


Nature #onelittletag


I had an artful day yesterday.  I went to the City Hall to pick up some of my paintings that were on display there to take them to the OPG, where my friend Margaret and I will be displaying some of our work.  Then, I am picking up some paintings from Sunnybrook Hospital tomorrow and then taking them to the City Hall on Monday to fill in the spaces I left empty yesterday. Lots of art juggling!
So anyways, I wanted to do a quick tag yesterday because I was kind of tired by the time I got around to it.  I wanted to try out my Penny Black "Hidden Lane" stamp.  I thought I would use the watercolour markers that I have had forever, and never used, on watercolour paper.  Them just trim it up and mount it on a tag.  Is it just me, or does everyone find that things rarely go as planned?


I was using the markers directly on the stamp, spritzing with water and then stamping onto the watercolour paper.  Then I thought I better use my stamp positioner since it looked like I was going to have to do this in layers. After playing around for quite a while and not getting the result I wanted, I decided to switch to Tim Holtz distress inks.  I did the same thing, applied to stamp, spritzed and stamped on watercolour paper. Still not what I wanted, so I thought I would switch to just regular white cardstock because I wasn't liking the texture of the watercolour paper. Same technique.  Better, but still not what I wanted. So, hours later...I finally decided on the distress inks on the white cardstock, NO spritzing and just a bit of a touch-up with an aqua-brush.  Note: I did sponge some broken china distress ink into the sky before stamping with a very light hand.


So now what do I do with it? I wanted a neutral palette, so I choose a kraft cardstock, trimmed it to size, die cut a rectangular aperture to frame my image.  Then I decided to run it through my crimper to give it some texture. I printed out the word "nature" on some patterned recollections stock that I still had out from my tag the day before. I trimmed the word and mounted it inside the window.  I added some string, which I tied in a loose bow and mounted the tag to a base I trimmed out of some more stock from my stash (7 Gypsies, I believe) in a dark burlap pattern. Trimmed the corners, punched the hole and tied several strands of the same string though the hole.  Finally done, but too tired to blog.

Wednesday, 6 January 2016

Keep it Simple #onelittletag

My tag today was fairly quick and easy.  I t was initially inspired by another lady,  Laurelle, in the One Little Tag Craft Challenge group on FB.  She used a stamped cork sentiment on her tag.  I knew I had some cork that I hadn't tried using before so I thought I would dig it out.
I had picked up some cork and some canvas in the craft section of The Dollar Tree, some time ago.  While I was digging for the cork, I ran across some Recollections card that I thought would work for what I had in mind

I used some letter stamps that I got at Target, when they were still here in Canada, and my Inkadinkado cling letter stamps with a simple stamp positioner I made for myself (something that really helps with the challenges of my vision) to stamp my message on the cork and canvas.  I cut the canvas wit scissors and frayed the edges ad I picked away some cork around the edge as well.

I trimmed the background stock, punched the corners and sponged the edges with ground espresso distress ink.
I assembled my tag, added some Tim Holtz tissue tape, some string from my stash and a pearl embellishment.  Then I mounted it to one of my pre-cut black matting backgrounds. I finished it off with some seam-binding ribbon.
 Easy peasy!


https://www.facebook.com/groups/OneLittleTag2016/204861373190039/?notif_t=like

Try Something New #onelittletag


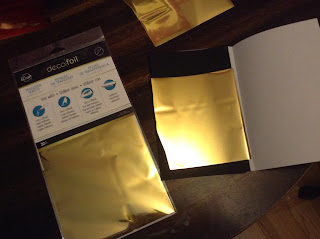
Try something new.  That is my mantra for the year and that is reflected (literally) in my tag for today. I am actually quite excited to share my new technique.  I have been wanting to try some foiling so before Christmas, I got some deco foil from Amazon.ca.  Jennifer McGuire (and I will try and figure out how to link to her blog) showed how you could use a laminator to activate the foil.  She also showed how you could photocopy something, or print something with a LASER printer (not an inkjet printer) and the toner would foil beautifully.  I have a laser printer, so I printed out a few things to try and it looked great, but I didn't go beyond that and I didn't actually make anything.  So I have been wanting to pull it out again and this tag challenge is the perfect venue for experimenting.  Then I thought, why not try copying  on black card?
I knew I wanted my tag to say "Try something new", which I didn't have a stamp for, so I just printed it out.  I used a JustRite stamp called Grand Damask for my background.  I stamped it with vesafine black onyx ink on copy paper.  I used my large oval punch to cut out my words, and positioned it on my background with a but of adhesive.


Then it was time to copy my image onto some black Recollections card.  I made sure that I knew exactly how my copy was going to come out of my printer and I put a tiny pencil dot on the top corner of my black card because I didn't think I would see the black toner on black stock.  I was ssurprised to discover that you can, which makes life (or at least this tag) a lot easier.


Then I trimmed down my sheet, and a piece of foil to fit.  I just used a folded piece of copy paper as a carrier to go through the laminator. BTW, I had the laminator on, heating up, while I did everything else.


I ran it through once and...


How beautiful is that???  Then all that was left to do was trim down my tag (even the off-cuts are so pretty that I will be able to use them on something else), punch the corners and a hole.  I used dollar store ribbon that I had in my stash to finish it off. 


I hope you enjoyed this, I have to admit, I really like the way this turned out and I will definitely be using this technique again.  The pictures don't really do it justice, it was difficult to photograph because the foil is so reflective, but it looks so elegant against the black card.  I felt I really got a lot of bang for the buck with this tag, it was surprisingly easy with a nice result.  This would be a great technique to use if you had multiple cards or tags to make.
If you like this, you should also check out Jennifer McGuire Ink, she has tons of great videos and lots of tips, tricks and info for card-makers (or anyone interested n giving card-making a try)


https://www.youtube.com/user/jennifermcguireink?feature=em-uploademail
One Little Tag Craft Challenge

Monday, 4 January 2016

Finally some tags! #onelittletag

Yay!  I finally finished some tags that I can post on the One little tag craft challenge as well as my new blog.  New things for the new year.  I have never done a craft challenge or a blog.  Who knows what else I may try this year...sky diving?


(my first 4 tags of the year)


As I mentioned in my last post, I am using a lot pieces from my stash and backgrounds that I have already created.  I like to matt my tags on black card, so I cut up some of those today to have on hand.  I did a little stamping, some inking and added a few embellishments.  I finished them off with some seam-binding ribbon.  I used a gold Sharpie to colour some of the embellishments..


(I already had the butterfly, but found the die.  I also used a Pitt pen to go around the butterfly and to underline SOAR)


Again, I had the bird, had already doodled on it, just added some inking, but pulled out the die for you to see


I felt this background was already busy enough, so I just stamped the word "breathe" and added it.  That is the word I was thinking of when I took a step back the other night after looking at everything I had pilled out.  The other words that came to mind were "pause" and "relax".  So I guess if I were to put these tags in order, those would actually be the first three.


I used a sharpie to colour some embellishments, but you could use any alcohol based marker, I think.  If you did some copic colouring, you could colour some coordinating embellishments for your project

Have a great day!  I will be posting some more tags soon and hopefully some paintings as well.
https://www.facebook.com/groups/OneLittleTag2016/204861373190039/?notif_t=like

Sunday, 3 January 2016

Getting started

Well I went through my stash and I have a ton of gelli prints that I had cut up for tag backgrounds.  I had stenciled, used some texture pastes and stamped several of them as well.   There are also some that I had experimented on with some gelatos. I haven't looked at these for a while and there are some that I really like.


 I also have a lot of pieces that I had die cut  and/or stamped and coloured, but never used in a project.  I like die cutting, for some reason.  I find it relaxing.  When I have everything out to die cut or emboss something that I need for a cad or tag I am working on, I generally do some extras while I'm at it.


(these are just a few!)


I thought this would make the "tag a day" challenge a lot easier.  All I have to do is take a background and a few die cut pieces and throw  a tag together.  Pretty easy, right?  So, I try and choose a background and some elements that would look good together.  Suddenly, I am looking at all this "STUFF" and I am completely overwhelmed!  Too much to choose from!
I have to take a step back and remember what this challenge is all about.  Just one little tag at a time.  There are 365 days in a year, and while I do want to make use of all the things I already have, I don't have to use everything at once.  I stepped away from the "stuff".  Now I have some ideas that I want to use for my first few tags.  Hopefully I will be able to "throw tem together" tonight and tomorrow.  I am anxious to post them in the group on FB.  There are already a lot of great tags posted.  I don't know that I will be able to do one every day, but I will do what I can.  This will help me achieve my own personal goal of seven cards or tags a week.

Saturday, 2 January 2016

Wishing everyone a healthy, happy and creative 2016.
My personal creative challenge is to create 365 cards and/or tags this year.  Initially, I thought I would try and do one a day, but I know that I won't always do that.  So instead of one a day, I am challenging myself to do seven a week.  Even if they are all the same and I do them all at once, seven cards and/or tags a week is my goal.  Now that I have made it official, I hope that will motivate me even when I'm in a creative rut.  Hopefully this will inspire you as well, Kerry (my sister).
I have also joined a Facebook challenge, hosted by Jenny of Craft Test Dummies to do a tag a day. (as I mentioned, I have never done a blog before and am very technologically challenged, so I will try and figure out how to  add a link for this)  I have never done a creative challenge before, so I am hoping this will be fun and inspiring.  Wish me luck!https://www.facebook.com/groups/OneLittleTag2016/