Showing posts with label Spellbinder's. Show all posts

Sunday, 22 May 2016

An Awesome Foiling Technique! Foiled borders using your Spellbinders dies


Hello my friends!  I was inspired to try this technique by a video I saw  by Becca Feakin. (I will share the link at the bottom of this post)  She used her Spellbinders Labels dies and her laser printer to get  awesome foiled borders!  I have been wanting to try this for a while and now I finally have and I love the look.  I am going to use my tag from my last post to help illustrate how I did this foiling technique (and some other ones!)
First I dug out some of my Spellbinders Labels dies


Now, I knew I would be isong these to creat tags, in this instance, so everything I did was with that in mind.  You may want to make cards, as Becca did. if that's the case, keep that in mind as you position your dies. I will probably use this technique to make some cards as well.  I chose the  dies that I wanted to use and positioned them on some blank white card.  I adhered them in place using a tiny removeable adhesive dot.  I postioned them so that I could cut them out into tags.  I should mention that if you are making cards, you could take a Card Creator or rectangle die that would fit the perimeter of your card panel and position that as well, to give your card panel a nice gold border too.


I positioned 2 smaller dies that I would use for sentiments alongside a tag on this sheet


I scanned and made a copy of these.  I think Becca just put her dies directly on the scanner, but I wanted to have copies I could use again.  Not only that, but I found that the copies weren't really dark in some areas, maybe because the dies are shiny and reflective.  So I wanted to darken them as well with a marker.


Then I got some light cardstock, some white and some patterned and all trimmed to 8.5 x 11"  to run through my laser printer.  NOTE:  You must use a laser printer, an inkjet printer will not work.  You could also use photocopies, but your copy must be toner based!
I copied my images onto the card and cut them down into tags


Now for the foiling!  I use a laminator and I find it works just fine, but if you have a Minc, you would of coarse use that.  I use a plain copy paper, folded in half, as a carrier.  I chose the foil that I wanted to use, placed it over the copied image (pretty side up!) placed it in the carrier sheet and ran it through the laminator.  I usually run it through twice just to be sure.


Now I take the coordinating die, place it over the foiled image, cutting side down.  I use some washi tape to hold it in place.  If you have a look at your Spellbinder labels die, you will notice that the cutting blade is not at the very edge of the die, but in the middle. 
Because of that, you end up with 2 pieces with foiled edges that you can use, the inner and outer die cut shapes.  If you use a different kind of die with the cutting blade at the very outside of the die, you will only have a foiled edge on the inside die cut shape.


Now, how did I do the gold foil outside border?  And the foiling on the flower embellishments?   Stay tuned for another post on some different  foiling techniques. I've been doing some experimenting and as soon as I get everything together to post, I will be happy to share.  If you like foiling, you will love it! 

I hope you have enjoyed this post and will give this foiling technique a try.    Give Becca's video a watch, it is very helpful and she is really sweet and she makes it easy to follow.
If you liked my post and found this technique fun and informative, please share it!  And let me know if you would like to see more technique based posts.
Thanks for looking, have an awesome and artful day!


           Scrappin' Great Deals (SGD)  http://www.scrappingreatdeals.com/home.php


Note:  I use ThermOweb Deco Foil and Minc reactive foil

Tuesday, 17 May 2016

Tag 5-7 "Trust the Magic" MMM 19 #onelittletag


Tag 5-7 "Trust the Magic"
Welcome to my blog!
A tag for the mothball challenge, which was the first week of May on the One Little Tag Craft Challenge. This tag is also doing double duty for both FB groups I am participating in.  Last weeks Mixed Media Morsel prompt was Silhouettes. 
I didn't use a magazine picture for this, as Cat Hand did on MMM, I used stamps and dies.. I used distress ink for the background and splattered it with water containing perfect pearls.  Distress inks are water reactive and I love the effects that you can get.  I used a Penny Black stamp for the flowers (pretty weeds?) silhouettes and a Prima stamp for my sentiment. I used 2 different Spellbinder dies for the Fairy and the Dandelion. As for the mothball challenge, I haven't used my  fairy die, black glitter paper and perfect pearlsfor a while
Thanks for stopping by and having a look!  Have an awesome and artful day!

Friday, 25 March 2016

Holiday Haul!


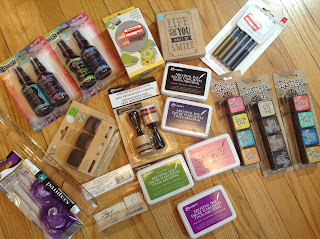
I had to do a little shopping while I was away, and I thought I would post a couple of pictures to share my haul.  That Minc foil in the top photo was my best find, $5 a roll!  I don't even know where to get it here and it's $25 each on Amazon.ca.
Art supplies and craft supplies are my addiction.  It doesn't take much to make me happy or keep me entertained.  Give me a new set of stamps and it makes me very happy, add matching dies and I am in heaven! A tube of paint or a new jar of medium and I am totally inspired!
Drop me off at Michaels and I am entertained for a good couple of hours,.  I am like a kid in a candy store when in Curry's or DeSerres.  I tell myself that since I don't drink or smoke, and I only shop for a good deal, it's okay, but the truth is, it's getting pretty crowded downstairs.  I know many of you will never understand how a new set of mini distress inks can bring such joy, but I know there are also many of you who will get it.  I will never understand why someone would want to spend 4 hours walking around a golf course when they could be painting or making a new tag, so I guess it's all perspective.
As soon as they open up an Art supply Anonymous in my area, I promise I will  attend. 

Tuesday, 1 March 2016

Another Month Finished #onelittletag


Another month of tags finished.  I can't believe that I have kept up!  I haven't done a tag every single day (although most days!)  and I often play catch up, but it is definitely keeping me in the creative frame of mind.  That is the whole point.  I have gotten things out from the back of the shelves and given them a little love, have done some experimenting and all-in-all, have been having a good time.
My own personal goal was to do at least seven cards or tags a week.  Not necessarily one a day, and not even necessarily seven different ones, just seven.  This challenge ( One Little Tag Craft Challenge on FB, for anyone new to my blog) has really kept me on track.  Actually, including the bonus tags and the duplicates, I have created 69 tags so far this year!  Wow!
So I would like to thank those of you who have been following along, and invite those of you who have recently viewed my blog to join me on my little tag journey of creativity.  AND my journey into blogging, something I have never done before (being as technically challenged as I am, lol)
Thank you and hope to see you here again soon!  If you like what I have been doing, please share! And if you enjoy making tags or looking at tags, you should check out and join One Little Tag Craft Challenge on FB hosted by Jenny Barnett Rohrs of CraftTestDummies.  It is a great group of talented and supportive and super nice people, and you are welcome to join at any time through the year.  I am enjoying it so much!

Saturday, 27 February 2016

Tag 2-26 Gone Fishin' #onelittletag


Tag 2-26 Gone Fishin'
This tag is a little out of order. I wasn't quite finished tag 25, but I wanted to get this one done for my friend Neil's 50th birthday.
I sponged on some distress ink in tumbled glass and stormy sky for the water, fading out in the centre for the moonlight on the water.  I cut a stencil out of some shelving liner and was going to use my never opened deco foil glue, only to discover that it was dried solid.  I tried to use some regular glue and brush it over the stencil, let it dry til tacky and add my foil, but NO GO. So, I punched out a circle for the moon from some glitter paper.  I sponged in the sky using the same two distress inks.. I did use a glue pen and foil to add the sparkle to the water.  I die cut the fisherman using a Joy Craft die and the cattails using a Spellbinder'ss die.  The dragonflies were punched out.  I used my silver ink to edge the tag. I assembled the tag and mounted to black card.
 I hope he likes it.

Monday, 8 February 2016

Tag 2-8 Write Your Story #onelittletag

Tag 2-8
Just a note to anyone who may be viewing my blog for the first time and doesn't know what I have been up to.  I am participating in a FB challenge called The One Little Tag Craft Challenge hosted by Jenny Barnett Rohrs of Craft Test Dummies.  The idea is to do a tag a day (or every couple of days, or whatever works) in order to create something every day and keep the creative juices flowing. This week there was an additional challenge which was to use "mothball" items. In other words, bring out those things that have been hidden away for a long time in your stash and give them some crafty love.
Once again, pretty much this entire tag is made up of mothball items. The DCWV paper pad is one I got a few years back and I just love, but have barely used, the typewriter is a Spellbinder's die that I haven't used for well over a year, another G45 sentiment that I haven't used and I dusted off some more Tim Holtz embellishments. Even the twine I dug out from my stash. I have used several things this week that haven't seen the light of day for quite a while. Good challenge!