Showing posts with label texture. Show all posts

Sunday, 18 September 2016

"Inner Workings" A new Mixed Media painting


Hello !  Today I bring to you my latest creation, a mixed media painting I have titled
 "Inner Workings"
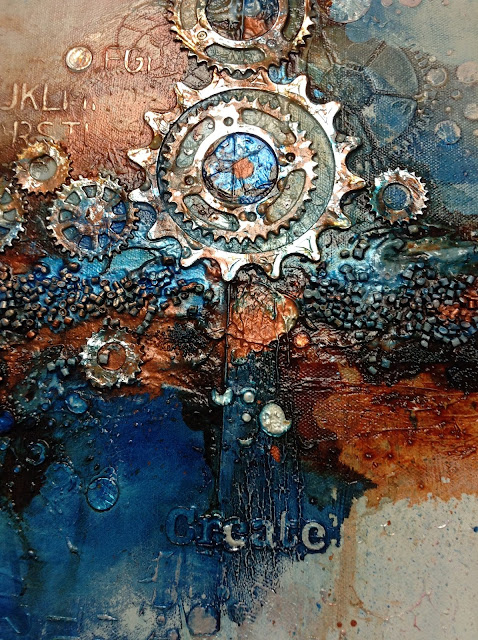
This painting will be heading to Art Square tomorrow, a downtown Toronto venue close to the AGO, along with several other paintings done by the talented artists in another group I belong to, Ajax Creative Arts.  It's difficult to see all the details and texture of this painting in a photo, so I have taken a few close-ups.  I really enjoyed creating this piece.  I had an idea what I wanted to do, but at the same time this painting was largely intuitive and very personal.  I knew what colour inks I wanted to use, I knew I wanted to use gears and I had a vision of the basic composition.  I knew I wanted a lot of texture.  I didn't know how it was going to come together and the words occurred to me after I had already started..  I like the idea that they are part of the painting, but not the focal point.  They will be discovered as someone examines the painting..  I am very happy how this painting turned out and for some reason, I feel a real connection to it.  I hope you enjoy the close ups and at the end I have shared a little of my process as well, if you are interested.


I was already into the painting when I thought that I should document the process for my blog.  I had already added a lot of texture with modelling paste, beads and crystals. and established my composition.  Once that was dry, I painted over everything with acrylic paint.  Then I decided I wanted to incorporate some words into the background and did some stenciling with some white pearl modelling paste.


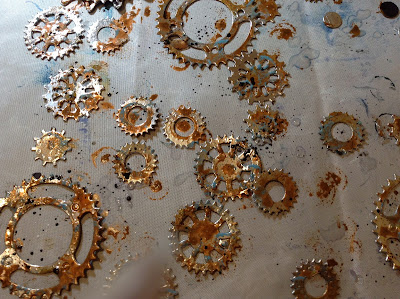
I created the gears using aluminum tape and I die cut them to shape.  Once my background was complete, I tempoarily added them to the background to give me an idea how I wanted to position them


Then I removed them, sealed them and aged them before adhering them to my painting


Now I was ready for the acrylic ink.  I added the ink in layers and moved it around with some water.  You can never predict exactly what result you will get when it dries.  While there was definitely a method to  my madness as I laid down the colours,  the ink does such wonderful things as it dries into the textured background that you cannot know as you lay it down.  I was excited when I awoke the next day to see how it had turned out.  I loved it!  As I move around the ink with water, there is a spray that occurs, which I like but It can be a little bit busy. So for my final touches, I muted some of the spray and recreated some quiet space.  I hope you like the end result

Thank you so much for letting me share my work, my process and my thoughts with you today.

Wednesday, 20 April 2016

Crinkled Tissue Textured Foiling #onelittletag #MMM


Hi there, thanks for joining me! 
I started off this blog doing some simple tutorials and I have kind of gotten away from that, so I decided it was time to do another.   This idea started off inspired by the Mixed Media Morsels FB group I have joined.  MMM # 5  uses tissue paper to add texture to your page.  I have used tissue many times on my canvases to add texture to my paintings.   So I have put a different spin on the challenge.  As some of you may know, I have been into foiling lately and a amassed a bit of a foil haul on my holiday. I was struck with an idea and what happened? The girl goes crazy!


I crumpled some tissue paper and put it directly on my scanner, wondering if the wonderful texture would translate to a useable image.


The image on the left is what I copied on my laser printer directly from the crumpled tissue paper.  I used this to print the copies on card.  The card on the right is a copy, which actually seemed to turn out darker.  I thought I would also copy some of the image on some coloured card for a different effect


I copied onto some light green, dark green (thinking of Christmas) and some black card (I love the look of foil on black card!)  Then I trimmed down the sheets.  These backgrounds will eventually become tags for the One Little Tag Craft Challenge, another FB group I belong to.  I trimmed down the foil, put it over the printed tag (foil side up), put it inside of folded copy paper as a carrier and ran it through my laminator.


I love the way they turned out.  It's difficult to photograph the foil so these don't do the tags justice.  But hopefully you get the idea and may want to give it a try as an interesting background for a card or a tag or in some of your other artwork. 


Monday, 4 April 2016

Another month of Tags #onelittletag


Another month of tags done.  There are several  unfinished tags this month, but the challenge is to be creative everyday, not necessarily finish one every day.  Or even like what you have done, for that matter.    I was away for a bit this month, so there was some catch up and I have had some other things on the go as well.  I do like what I have done this month.  I did some experimenting and playing and had some fun.  I hope you have enjoyed seeing what I have been up to, I really appreciate you visiting my blog!


Saturday, 26 March 2016

More fun with foam #onelittletag


Hi there!  My blog today is a continuation of yesterdays post. After getting such a good result with the textured fun foam, I wondered how well my own textured foam would work.  I have several embossing folders with great patterns and thought I could make some interesting textured foam.  I wanted to share my results.  I noticed that the foam I used yesterday was a little thicker than usual, so I adhered 2 sheets together and cut them down to sample sizes.  I chose some of my folders by a few different companies.  I ran them through my Cuttlebug, passing it back and forth a couple of times to make sure there was a good impression.  I used my distress ink and ran it over the foam and put my card on top and rubbed.  One of the bonuses to this method is that you also have the negative image on the other side of the foam, so I tested both sides.


I have to say, I think the textured foam I purchased worked a little better and gave a cleaner image.  But, I do think that the foam I made with the embossing folders gave some very interesting and distressed effects, too.  What do you think?


I'm dying to share my little arty find with you! #onelittletag


How did I get all those yummy textural impressions?  Glad you asked, because I am dying to share my little arty find with you!
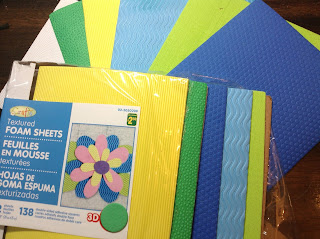
I was in the dollar store to get a couple of neck cushions for our flight, and I always have a peek in the craft section.  I was rushing through, but there I spotted it, textured fun foam!  I though it would be great, if it worked, and tossed it in the cart.
Today I pulled it out to give it a try.  I lightly ran my distress ink across the foam and placed my tag on top and rubbed.  I was really pleased with the results!  So. I thought I would share.  I am going to give it a try with my Gelli plate, too, when I get a chance.  I'm not sure if the pattern is deep enough to work with the plate and the paint, but nothing ventured, nothing gained, right?


The sheets are 20 cm x 15 cn (7.8" x 5.9") and there are 2 of each per package.  I may try cutting out different shapes and using them as stamps.  I will let you see how that looks when I do it.
I got my textured foam sheets at Dollarama.  I think they may only be in Canada, but I'm sure this foam must be available in other stores.  So if you like the look of this texture, keep your eyes open in the craft or kids section of your local store.