Showing posts with label Stampendous. Show all posts

Wednesday, 14 December 2016

Cutting thin dies on a Cuttlebug without a C-plate


Hello my friends, thanks so much for joining me!  today's post is written for my sister, Kerry.  She lives about 3000 miles away on the other side of the country.  She has started doing some paper crafting this year and so I decided she needed a Cuttlebug, whether she wanted one or not, lol (I am the bossy older sister, can you tell? lol)  Luckily, she did want one!  However, it does not come with the C-plate which adapts to the thin dies.  This is fairly new to Kerry and she had never used, or even seen the Cuttlebug before it showed up at her door.


 So, I have done some experimenting and am going to try and show her (and anyone else who may find it useful) a way to shim it up for the thin wafer dies.  Right of the top, I want to say that Provocraft, the manufacturer of the machine, and any of it's distributors would probably recommend that you get a C-plate, and not try shimming it.  If you can, that is certainly the best option.  That is what I use.  Please be careful not to shim it so much that you cannot run it through safely.  So as much as I hate to add a disclaimer, you will be trying this at your own risk.  I can say that I had no trouble with this before I got a C-plate and I have been using the shim all night to do my die cutting tonight, instead of the C-plate.  Pay attention to your machine, if it is too thick, don't try and force it.


I used some heavy chipboard from the back of one of my paper pads.  This is the stiff heavy card found on the back of some pads, not the flimsy card.  If that is all you have, though, you can also make that work, you will just need to layer more pieces together.  I placed a B-plate down on the chipboard and traced around it.  Then I cut out 2 pieces. (After using it for a while, I would suggest that you cut them slightly smaller)


The "sandwich" that I used was first, as always, the A-plate, then the 2 shims that I created (cut card), then a B-plate.  Then I put down a sheet of fun foam.  You don't have to do this, but it is something I always do, especially when I am using an intricate die.  I find it seems to cut better, come out of the die easier and does a bit of embossing at the same time with the dies that offer that.  But this is just a preference of mine and totally optional.  On top of the fun foam, or the B-plate if you are not using the foam, I place the paper I am going to cu.  I place my die, cutting edge down, on top of that and then, finally, the second B-plate.  Then I run it through the Cuttlebug.  Each Cuttlebug may be calibrated slightly differently, so you will have to play with your shims.  You want the fit to be tight because you are using the pressure to cut your paper or card.  BUT, DO NOT TRY AND FORCE IT IF IT DOES NOT WANT TO GO HROUGH! You could damage your machine.

I have found it helpful, whether using shims or  a c-plate, to offset the centre of the sandwich just back a bit, so that feeds more easily into the machine.


If you are using several layers of lighter card to shim, then I would suggest that you tape of glue them together so that they are not sliding around.

I hope that you have found this helpful!  Kerry, I hope this helps, give it a try and give me a call!  I will look forward to seeing some photos of your new creations!

Thanks again, for stopping by!  Wishing you all a wonderful and artful day!

Friday, 9 December 2016

A Truckload of Christmas Wishes Ver. 2 - New Christmas card


Hello again my friends!  As promised, here is version 2.  As I am looking at it here, I think it needs a little something more.  I'm not sure what, perhaps the background needs to be a little darker and with more interest.,  You can barely see the snow falling in the background.  I should be able to fix that fairly easily.  There will be a third card in this series, but it requires a little more assembly and it is way past my bedtime!  Teaser alert- I will be combining with a Tim Holtz die!  I will have it posted in the next day or so.


Thank you again for stopping by!  Have a wonderful and artful day!

A Truckload of Christmas Wishes - New Christmas card


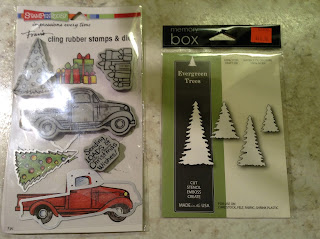
Hello my friends!  A new Christmas card to share today.  I have to admit, I'm not usually one to do a lot of colouring.  With my vision it is very difficult, so I tend to keep it very basic and "rustic".  But I had seen this stamp and die set on-line and I just thought it was so cute, I had to have it.  After I ordered it, I saw it at Michaels (where it had not been a couple of days before, lol)  I was so anxious to receive it, but the truth is, things have been so hectic that I am finally just getting to use it now.  I decided to try a little scene building.  So I got out a few more stamps and dies.


(please excuse the photos, I am having some lighting issues right now)


First I stamped my house and created a mask to cover it while I created a background.  I used Broken China distress ink for my background and splattered it with some Heidi Swapp white Color Shine.  I used some torn paper to create my snow drifts.   I used my Spectrum Noir markers to colour th truck and presents and the house.  The window actually die cuts right out of the truck, but I popped it backed in and added a suggestion of a driver.  I thought a driverless truck would be a little creepy!  I used my snow marker to add some snow to the trees and house.

Once all my colouring and die-cutting was done, I assembled my card.  I added some shimmer with my Wink of Stella.  I mounted the card-face to some patterned paper to vorder it, and then to my card base.

I also cut and coloured a few more trucks at the same time, so I will be posting another card shortly that I have just about finished,  Then there will be another card coming down the pipeline soon.  I feel it makes sense to use your materials while you have them out.  but you don't necessarily have to make them all the same, although mass producing isn't a bad idea, either.  So if you like this card (which I hope you do because it was fun to make!)  Then check back in to see the next version very shortly.
Thanks so much for stopping by!
Hugs!

Monday, 5 December 2016

"Merry Christmas" new Christmas card


Hello my friends!  A very quick post to share my latest card with you.  I was looking for a poinsettia die  and I found this stamp and die set..  I actually passed it by a few times because I didn't like the way the example looked.  I do have some poinsettias dies, but not one that I love.  After about the third time I was at the store (Michaels) and during a 50% off deal, I finally gave in.  I'm glad I did because I do like it.  I hope you do, too!

The Merry Christmas sentiment was from my stash.  It is an Yvonne Creations die from Find It Trading.

Thanks so much for visiting and make sure to check back in for more Christmas cards.  Feel free to share with anyone you tihnk may want some  holiday card inspiration.
Have an awesome day!

Tuesday, 23 August 2016

Tag# 8-23 "The Sky's the Limit" #onelittletag


Hello!  Thanks for stopping by.  I am still in a tag making mood, so today I have another tag to share.
I used a distress ink background.  I cut out a cloud shape from some copy paper and used it as a mask to create my sky background.


I used a Deep Red stamp for the "flying machine", an Andy Skinner stamp for the birds and a stamp that I got at Michaels that came with a stencil, I believe it is Recollections.
Before creating the clouds, I first lightly stamped the image in distress ink so I could see where it would be.  Before re-stamping the image in black, I used some metallic markers to olour in some of the gears, some other areas  and the propeller .   Then I over stamped with black versafine ink.  I used my stamp positioner to do this.  I stamped the birds and the sentiment.  I also stamped another image.  I coloured in the bottom  boat looking section of the the machine with distress ink, and the propeller with the silver marker.  I cut both of these out and adhered them to the image to give it some dimension.  Unfortunately, it's difficult to see the dimension in the photo. 


Thank you for taking the time to have a look at my tag!
Have an awesome and artful day!


Sunday, 22 May 2016

Tag 5-6 "Smile" Foiled Tag #onelittletag


Hello my friends!
This is tag 5-6.  This tag is for the "mothball" challenge, which challenges us to look in the back of the cupboards or shelves and dig out the forgotten treasures that we haven't used for a while, dust them off and give them some crafting love!   I haven't used my Spellbinder's Labels dies in ages!  I have actually been wanting to use those dies to try a foiling technique, so this was a good opportunity to get them out.  I and I am really happy with the outcome!  I have been doing some experimenting with foiling and I have used a few different techniques on this tag.
I will be dedicating a few posts to sharing these techniques with you.  So if you like foiling, be sure to come back and check them out, you will love them!


Thanks so much for stopping by and have an awesome, artful day!


Tuesday, 9 February 2016

Tag 2-9 Snowy Night #onelittletag


Tag 2-9
I really struggled with this one and I just couldn't leave it alone, it kept getting messier and messier. I'm not sure if I like it or not. One minute I look at it and say, yeah, it's okay, and the next minute I don't like it. When I made my tag 23, I tried out a few different backgrounds, this was one of them. I wiped my distress ink on the kraft mat, sprayed with water and dredged the paper through it. (there is one more backgroung that was very similar to this one and I've done something completely different with it). I used a Stampendous stamp set. The only thing I had used out of it was the birds. It did not start off as a snow scene, but one thing led to another...