Hello my friends! Welcome back for some more foiling fun. If you saw yesterdays post, you may recall how excited I was to find some new ways of foiling. I had not heard of the new Minc reactive paint and foil reactive spray. I was delighted to discover that Heidi Swapp metallic embossing paste and screen ink were also foil reactive. Especially since I had some of both. But it got my mind turning and I wondered if other pastes and mediums would work, which happily they did! If you didn't see yesterdays post, you may want to have a look at it because this is a continuation of that post. I tried several different things and of coarse, I couldn't stop! So here are the results of the other products I tried and my own reactive spray! Everything I tried was successful, although some did give better results than others.
I have a lot of different products on hand that I use. I realize that some of you that don't paint may not have most of these products, so I thought I would try godd ole Mod Podge as well, since that is something a lot of crafters use.
I ran the various gels and pastes through a Tim Holtz stencil and let them dry thoroughly before foiling. I just use a regular laminator to do my foiling, I do not own a Minc. I use a folded sheet of copy paper as my carrier .
Starting from the top left: Liquitex Pouring medium, Golden Regular Gel, Golden Soft Gel, Golden Coarse Molding Paste (bottom left) Golden Light Molding Paste, Golden Molding Paste, Tri-Art Gloss Gel Medium, Tri-Art Molding Paste
The foil clung to everything I tried! I found that it adhered best to the gels, the pastes seemed to have a more distressed look, especially the coarse molding paste. Depending on the end result you are looking for, this is also a very cool effect.
I also tested Liquitex Pouring Medium, Liquitex Gloss Medium/ Varnish (painted on with a brush) and Mod Podge.. All of these worked very well
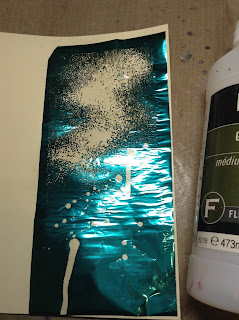
Until I saw Kate Palmer;s video, I didn't even know that there was a foil reactive spray on the market. I decided to try my own spray. I used 1 part Pouring medium and just less than 1 part Air Brush medium which I shook together in a spray bottle. This gave me a pretty fluid consistency. This worked very well and gave an interesting effect.I think next time i may try using a little less air-brush medium to see what effect I will get with a little heavier texture.
I also dribbled some of the spray mixture onto the card and let it drip as well.
Then i decided to try something else. I don't want to waste a bit of my foil so I decided to try and make use of some of the leftovers that had a good image. I painted a coat of Liquitex Gloss Medium onto some card and used the reverse image in the left over foil to foil another tag
This also worked very well. Mod Podge also works (I did try that as well) But please note, any area that is coated with the medium, or mod podge if you choose to use that, that is exposed and not covered by foil WILL stick to your carrier sheet. I use copy paper as my carrier sheet, but take special care if you are using a good Minc carrier. You could also use paper, but either way, make sure it is entirely covered so that you don't ruin your project!
I am going to share an accidental bonus with you today. I used Faber-Castel Gloss Gel Medium through a stencil onto one of the tags I had made during my play with spray and stencils. My intention was to do some foiling, but when it dried, an interesting thing had happened. The darker spray from underneath, leached up into the medium and gave it a very interesting effect. So I decided to leave it as it is.
Thanks so much for joining me once again. I hope you found this information fun and useful and will give it a try. . You don't need a lot of fancy equipment and products to do foiling, just a regular laminator and products that you may already have at home. I am already making good use of this new knowledge, which you will see soon! My mind is still whirling with ideas, so there may soon be a Part 3 to the Foiling Awesomeness. I have some more experimenting to do. Thanks again for looking at my blog, Please share if you know any foiling fans that would enjoy trying some of these options!
Have an awesome and artful day!
Be sure to check out some of my other foiling posts


Kimberly, this is such a wonderful experiement!!! I love it. Since I have a laminator I will have to give this a try. All of yours looked really nice. Thanks for sharing this, I can now do something that I had not even given thought to, since it would have taken a big purchase. Have a wonderful weekend and be sure share any more experiments you do. Yay!!!! hugs, patty
ReplyDeleteGreat post, Kimberley...love all your experimenting with this!
ReplyDeleteThanks, Winn! I have a lot of fun doing it. There are a few more ideas I have, so there should be more experimenting soon! Thanks so much for all your nice comments, Winn!
DeleteFabulous!!!
ReplyDeleteThank you for looking and commenting! I'm glad you like it and hope you can give it a try!
Delete