Monday, 30 May 2016

Foiling tid-bit Bonus!


Hello my friends!
This is not the foiling technique that I have been promising will come this week, it's a little bones that I kind of discovered by accident.
Today I am sharing a little foiling technique that I discovered while I was doing the glue resist technique with the rubber cement that I shared a few posts ago.

I drizzled the rubber cement onto my page to use as a glue resist.  I noticed that the glue was still tacky after it dried.  With the resist technique, I painted over it and then rubbed away with glue after everything was dry.

Afterwards, I wondered if the dry glue would be tacky enough to adhere the foil, so I thought I would give it a try.  I drizzled some rubber cement onto a scrap index card I had used to wipe up some paint.  I let it dry and put the foil on top and rubbed it firmly over the glued areas, and Voila!


I hope you enjoyed this little post.  As you can probably tell, I am having a good time with the foiling.  So if you like it too, you can look forward to some more great foiling techniques.  I have another one coming up this week, that I am kind of excited about!  And who knows what else I will discover as I am playing around, or what YOU may discover!

If you are interested, I did an earlier post on foiling.  Actually, the fourth post I had ever done!

Thanks for joining me!

.


Sunday, 29 May 2016

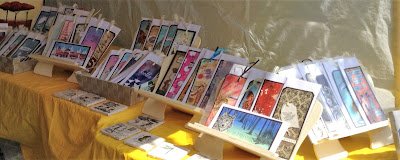
Artfest on the Esplanade


(lots of tags!  Many you may have seen from the FB group, One Little Tag Craft Challenge, that I am participating in))


Hello my friends!
This is what I was up to yesterday.  Every year, the City of Pickering, along with Pine Ridge Arts Council (PRAC) holds Artfest at the end of May.  There are Many different artisans displaying their work, from painting, photography, wood carving, lots of jewelry, glass work, textile work and many  more!
Often there are performing arts as well with dancers and bands.  This year the was a  Blues Fest and I was in a great spot to be entertained by the great music all day..
It was a beautiful day, although quite hot.  I ended up with a fantastic spot right near the entrance and shaded under the trees.  For some reason, it is often really windy at Artfest, which is a little annoying when you are trying to keep your display from blowing all over, and you wish the wind would stop!   Be careful what you wish for!  This year everyone was wishing for a little wind.  I have to say, I did get a little bit of a breeze where I was.  So, once the set up was done (it was definitely hot doing that), and I could just sit down and relax, I was pretty comfortable.
Usually, my daughter is with me at Artfest, helping out.  She can man the booth so that I can have a look around, chat with my friends that are also participating or take a bathroom break (it's a long day that calls for lots of water!).  But she was busy yesterday, rehearsing all day for her High Schools performance of "Hairspray", which she is STARRING in (how proud am I!).  It starts a four day run on Wednesday night.  So I doubt I will see much of her until it is over.  I can hardly wait to see it!  But I really missed her yesterday at Artfest.  She's always a great help and good company for a long day.
I have to say thank you to my friend Margaret, who was also doing the show, she was there if I needed a break, and thanks to my friend Bonnie, who cam by and she took care of things so I could have a look around.
There was a lot of people out, enjoying the weather, taking their dogs for a walk, having a beer and listening to some blues and just having a nice day.  So there were lots of people to talk to.  This is never a high sales  show for me, but I do it every year just because I enjoy it.

Mary and Cathy from PRAC were there, making sure things were on track and Mary got a lot of pictures of the show which maybe I will be able to add to this post,  or link to, if it's okay with Mary, and those of you that have never been can see what it's about and maybe join us next year!
Thanks for stopping by, have an awesome and artful day!

(TEASER:  Watch for more foiling techniques this week if you are interested!)

Saturday, 28 May 2016

Glue Resist Technique MMM #4 #onelittletag


Hello my friends!

Today Ii am doing a glue resist technique which will become (eventually) a background to some of my tags and my take on MMM #4.  Cat Hand, of Mixed Media Morsels used a regular school glue  to draw some designs on her page.  She let it dry and used it as a resist. She watered  down some paint, painted over the glue and could just wipe the paint off of her design. She also ran her ink pad over the top (once dry, the glue had some dimension) to highlight it, and it looked pretty cool.   It reminded me of a similar technique I had been wanting to try.
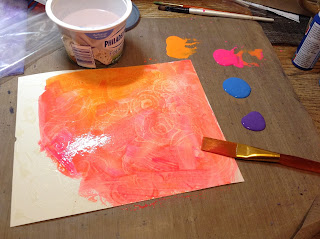
I used rubber cement as my glue, drizzling it all over my page (watercolour paper).  Once dry, which didn't take long, I also watered down some craft acrylic paint and painted my page


Once the paint dried, I rubbed the rubber cement away, leaving the white paper underneath


Thanks for stopping by, I hope you enjoyed my technique today!


Thursday, 26 May 2016

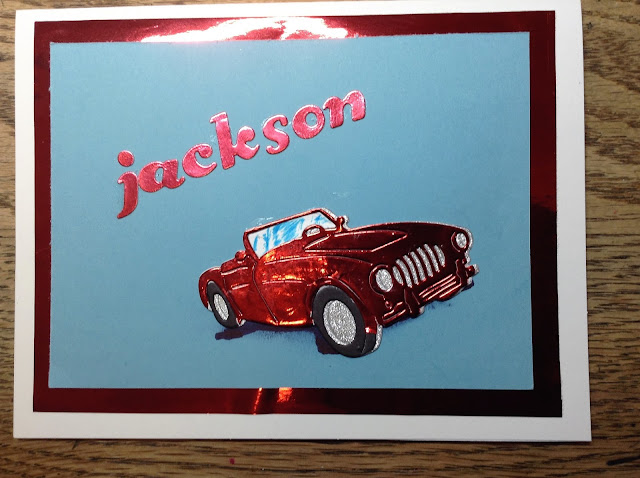
Jackson's Card


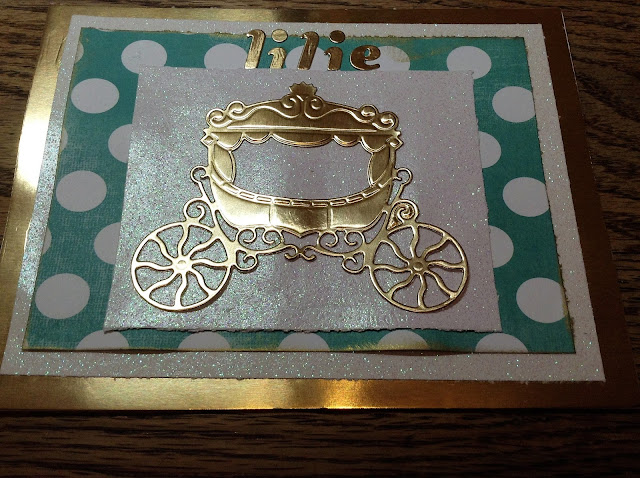
Lilie's Card


Some new cards - Welcome Little One!


Hello!  Today I thought I would share some cards I have been making and this is the first of three.  My friends daughter just had a new little baby boy (I saw him today and he is soooo precious!).
I water coloured a background, used a Memory Box die for the clouds..
(I  cut the clouds out of white glitter paper.  I don't know why they look pink in the photo!)  I used a Little B die for the little onesies.  I often use fun foam behind my paper or card when I am die cutting, especially with an intricate die (which this really isn't).  The reason is that it embosses at the same time as die cutting and when a die has a lot of little cut outs, they come out much easier, I have found.  I am telling you this because I was cutting out the onesies from white card and I used some blue foam behind it, but then thought they looked better out of the blue foam, so I used those!  A Kaisercraft stamp and a piece of string.  I assembled it and affixed it to a pre-scored Recollections
5" x 6.5" card.
Sometimes it's hard for little ones when a new baby comes along and gets all the attention and a bunch of presents, too!  So I like to include all the kids so I had a couple more cards to make...

Monday, 23 May 2016

MMM #11 Torn Paper Strips Mixed Media Morsels

Welcome to my blog!
This is a background I created using torn paper strips, a prompt from Cat on the Mixed Media Morsels FB group.  Cat Hand posts weekly videos with different mixed media techniques to try.  She calls them "morsels".  I have been doing my morsels in a random order.  Sometimes they might work with a tag challenge that I am doing, or sometimes Ii may have supplies out that will work with a particular morsel, or sometimes there may be one that I am just in the mood to try.  I did join this group a little late, but there is no pressure to get anything done by a specific time and they are all just suggestions.  Everyone does them their own way.  But again, as in the One Little Tag Craft Challenge FB group that I participate in, it's all about staying creative and inspired.  Keeping it fun is a big part of the creative process, in my opinion anyways!
For this technique, I took some printed tissue (that I used for MMM #5 an earlier post), some plain tissue paper and some plain white paper.  I used various different sprays, Dylusions, Heidi Swapp, Recollections Colorsplash or Boho and some Lindy's stamp gang..  I sprayed the paper and tissue, let it dry and then tore it into strips.  I collaged the strips onto the tag with mod podge.
I like the way this turned out and I have lots of papers left to collage some more tags or maybe a canvas.
Thanks for looking, have an awesome and artful day!

Sunday, 22 May 2016

An Awesome Foiling Technique! Foiled borders using your Spellbinders dies


Hello my friends!  I was inspired to try this technique by a video I saw  by Becca Feakin. (I will share the link at the bottom of this post)  She used her Spellbinders Labels dies and her laser printer to get  awesome foiled borders!  I have been wanting to try this for a while and now I finally have and I love the look.  I am going to use my tag from my last post to help illustrate how I did this foiling technique (and some other ones!)
First I dug out some of my Spellbinders Labels dies


Now, I knew I would be isong these to creat tags, in this instance, so everything I did was with that in mind.  You may want to make cards, as Becca did. if that's the case, keep that in mind as you position your dies. I will probably use this technique to make some cards as well.  I chose the  dies that I wanted to use and positioned them on some blank white card.  I adhered them in place using a tiny removeable adhesive dot.  I postioned them so that I could cut them out into tags.  I should mention that if you are making cards, you could take a Card Creator or rectangle die that would fit the perimeter of your card panel and position that as well, to give your card panel a nice gold border too.


I positioned 2 smaller dies that I would use for sentiments alongside a tag on this sheet


I scanned and made a copy of these.  I think Becca just put her dies directly on the scanner, but I wanted to have copies I could use again.  Not only that, but I found that the copies weren't really dark in some areas, maybe because the dies are shiny and reflective.  So I wanted to darken them as well with a marker.


Then I got some light cardstock, some white and some patterned and all trimmed to 8.5 x 11"  to run through my laser printer.  NOTE:  You must use a laser printer, an inkjet printer will not work.  You could also use photocopies, but your copy must be toner based!
I copied my images onto the card and cut them down into tags


Now for the foiling!  I use a laminator and I find it works just fine, but if you have a Minc, you would of coarse use that.  I use a plain copy paper, folded in half, as a carrier.  I chose the foil that I wanted to use, placed it over the copied image (pretty side up!) placed it in the carrier sheet and ran it through the laminator.  I usually run it through twice just to be sure.


Now I take the coordinating die, place it over the foiled image, cutting side down.  I use some washi tape to hold it in place.  If you have a look at your Spellbinder labels die, you will notice that the cutting blade is not at the very edge of the die, but in the middle. 
Because of that, you end up with 2 pieces with foiled edges that you can use, the inner and outer die cut shapes.  If you use a different kind of die with the cutting blade at the very outside of the die, you will only have a foiled edge on the inside die cut shape.


Now, how did I do the gold foil outside border?  And the foiling on the flower embellishments?   Stay tuned for another post on some different  foiling techniques. I've been doing some experimenting and as soon as I get everything together to post, I will be happy to share.  If you like foiling, you will love it! 

I hope you have enjoyed this post and will give this foiling technique a try.    Give Becca's video a watch, it is very helpful and she is really sweet and she makes it easy to follow.
If you liked my post and found this technique fun and informative, please share it!  And let me know if you would like to see more technique based posts.
Thanks for looking, have an awesome and artful day!


           Scrappin' Great Deals (SGD)  http://www.scrappingreatdeals.com/home.php


Note:  I use ThermOweb Deco Foil and Minc reactive foil

Tag 5-6 "Smile" Foiled Tag #onelittletag


Hello my friends!
This is tag 5-6.  This tag is for the "mothball" challenge, which challenges us to look in the back of the cupboards or shelves and dig out the forgotten treasures that we haven't used for a while, dust them off and give them some crafting love!   I haven't used my Spellbinder's Labels dies in ages!  I have actually been wanting to use those dies to try a foiling technique, so this was a good opportunity to get them out.  I and I am really happy with the outcome!  I have been doing some experimenting with foiling and I have used a few different techniques on this tag.
I will be dedicating a few posts to sharing these techniques with you.  So if you like foiling, be sure to come back and check them out, you will love them!


Thanks so much for stopping by and have an awesome, artful day!


Friday, 20 May 2016

Mixed Media Morsel #5 - Tissue paper background


Hello my friends!
Todays tag is for the Mixed Media Morsels group.  This is MMM#5, which is a prompt to use tissue paper as your background.  I used Tim Holtz printed tissue paper, mod podged it onto my tag.  I then used various  Dylusions sprays to colour it.  For the finishing touches, I used my Gold ink pad to swipe across the raised areas and along the edges and finally, some black archival ink on the very edges.  Oh, and of coarse, some splatters!  I like how this turned out.  I'm not sure how I am going to finish off this background into a tag, but I will be sure to share when I do!
Thank you for stopping by.  Have an awesome and artful day!

Tag 4-19 "Peace starts with a Smiile" #onelittletag


Tag 4-19  Fiber prompt
Welcome to my blog! As some of you may know, I have been participating in  the One Little Tag Craft Challenge on FB, hosted by Jenny Barnett Rohrs of Craft Test Dummies.  We are given prompts once a week to keep us inspired in creating our tags. I have not completely finished all the tags for April, but I have done a lot and have decided that I am calling it a day and moving on.  I am still behind for May, but that is what I am going to focus on, as well as some other art projects (and experiments!) that I am working on.
The idea behond this challenge is to be creative every day.  I have to admit, doing this challenge is definitely keeping my creative juices flowing!  I have decided that I am not going to get hung up on the challenges, or prompts, which are just a suggestion anyways.  I will probably try a couple and then just do what I feel inspired to do.  If I am enjoying the prompt, I will stick with that.  Either way, these FB groups have really been motivating.  On the days I don't get a tag created, I am usually still experimenting with something, or working on a painting, or sometimes just thinking about what to do next.  So now I think I am hooked!  I also participate in a group called Mixed Media Morsels and I have also been sharing my tags and art on a G+ Group called Creating and Sharing Mixed Media Art.  So a big shout out and thank you to those of you out there who are putting in the time (and I am quite sure there is a lot of time donated) and effort to create and maintain these inspiring groups (and there are many!)

Tuesday, 17 May 2016

Tag 5-7 "Trust the Magic" MMM 19 #onelittletag


Tag 5-7 "Trust the Magic"
Welcome to my blog!
A tag for the mothball challenge, which was the first week of May on the One Little Tag Craft Challenge. This tag is also doing double duty for both FB groups I am participating in.  Last weeks Mixed Media Morsel prompt was Silhouettes. 
I didn't use a magazine picture for this, as Cat Hand did on MMM, I used stamps and dies.. I used distress ink for the background and splattered it with water containing perfect pearls.  Distress inks are water reactive and I love the effects that you can get.  I used a Penny Black stamp for the flowers (pretty weeds?) silhouettes and a Prima stamp for my sentiment. I used 2 different Spellbinder dies for the Fairy and the Dandelion. As for the mothball challenge, I haven't used my  fairy die, black glitter paper and perfect pearlsfor a while
Thanks for stopping by and having a look!  Have an awesome and artful day!

Monday, 16 May 2016

Tag 5-13 "Hello" #onelittletag


Helloo my friends.  This is another paper napkin tag that I am doing for the FB groups that I belong to (One Little Tag Craft Challenge and Mixed Media Morsels).  As I mentioned in my last post, I am keeping it brief, this is about sharing the tag because you have been bombarded with the process all week!  However, if you are new and would like to know the process, please look at my previous posts this week.  I hope you give it a try and have some fun!


I've had a lot of fun with these paper napkin tags this week, I hope you enjoyed them!  I still have some backgrounds I made that I haven't used, so you can expect to see a few more at some point.
ALSO, for those of you that enjoyed the foiling techniques I have shared, there will be another one this week, so stay tuned!

Thank you for stopping by and having a look!  Have an awesome and artful day!


Sunday, 15 May 2016

Tag 5-12 "From New York to Paris" #onelittletag


Welcome to my blog!  I am still doing the paper napkin prompt for my tags,  so I am going to keep the next few posts brief because you've been hearing about the process all week!  So these are just about sharing the tags.  However, if you are new to my blog and are interested in knowing the process, please look back at my previous posts this week.  I have been enjoying myself and liking the results.  I hope some of you give it a try!


Thanks for stopping by!